1. originally, for photographic film, gamma value was used to distinguish high/low contrast film. Gamma = slope of log exposure (input) to log density (fraction light transmitted). High contrast = small range of exposure causes a large change in film density.
2. What has gamma besides film? your monitor, video card, maybe a fancy printer, and Photoshop. (most plain printers have gamma of 1.0 which is a linear response, non-film- like, zilch gamma-effect)
3. Problem: you adjust your image on the screen in some application, and then you print it. If printer has no gamma correction, and you haven't imparted one onto your image via software, you get a linear response -- and may well think "something is wrong".
4. Possible solution: for a given computer/monitor/printer that you normally use, experiment with some common images, adjusting the gamma -- and print out on your usual printer. Once you have hit upon a range of "good" gammas, your eye/brain should be able to guesstimate proper gamma range for future images--this will save you time, allowing you to narrow in on the proper gamma much quicker.
"Adjusting the gamma is similar to adjusting the brightness, except that adjusting the brightness produces a linear change (all shades shifted by an equal amount toward light or dark), whereas adjusting the gamma produces a logarithmic, or curved, change (shades closer to light or dark are shifted more than midrange shades." (Photoshop 4 Complete p. 765)
2. Under Image, select Adjust, then Levels
3. Click Preview so you can see effect of changes.
4. You have a histogram of intensities; 0, the far left, is the black bin; 255, far right, is the pure white bin. If the intensities are not ~evenly distributed you may want to drag either right or left (upper) caret in to utilize the full output range. Optimally, of course, you want your raw image to span the full range of intensities.
5. To adjust gamma, grab the middle caret and drag it left or right, depending upon what adjustments you want -- mainly in accentuating/increasing contrast in either the low intensity (dark) or higher intensity (light) parts of the image.
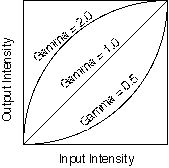
a. Dragging it left increases gamma, which is the upward curve on the diagram: it preferentially increases brightness and contrast of the darker features, while having less effect on the brighter features.
b. Dragging it right decreases gamma, which is the downward curve on the diagram: it preferentially increases brightness and contrast of the lighter features, while having less effect on the darker features.
Write down your changes.
6. After adjusting gamma, now go and adjust brightness (B) and contrast (C): Image --> Adjust --> Brightness/Contrast (write down your changes)
7. Continue, iterate once more if necessary. After you apply a gamma, and say OK to get out of the Levels window to print it out, it resets gamma to 1.0. So if you want to apply a second or third correction, you can calculate what value you need to apply the next time, to do it in one operation: gammas are log features, so if you first apply 2.0, then next 1.5, the sum total is not 3.5, but 3.0 --> log a + log b = log (a*b)
1. As a reference, print out an image (greyscale) you have that has fine detail in it, more than 600 ppi (pixels/inch). (Alternately, use the image TEM22G.TIF on the photoshop page ) Go to Page Setup under File, and select the Screen button in the lower half. You will see that the default setting is 53 lpi. Go ahead and print that out.
2. Now change that screen setting to 150 lpi, and print out the same image. Compare. (leave the other settings at Diamond, 45 degrees, and do not select accurate screens
Mackenzie says HP knows about this but for some reason can not/will not tell users about this. He calculated that instead of being a 600 dpi printer, it really is a 1800 dpi printer, using the following logic: the pixel is 12x12 (>128 gray levels), and the output is 150 lpi (empirically determined by him). 12 dots per pixel (line)x150 lines/inch = 1800 dpi
Why ...? Lines per inch, dots per inch, pixels per inch....
1. How to get grey levels from black ink; need to trick the eye, with a pixel, created with a matrix of x by x smaller cells/dots; if all empty = white; all filled with ink = black. To have 256 grey levels, need 16x16 matrix; 144, 12x12.
2. 1 line = 1 line of cells or pixels, so 10 lpi = 10 pixels/inch
3. standard laser printer = 600 dpi; HP6 says has "at least 128 levels of grey". square root of 128 = 11.3, so they're probably at 12x12.